Showing posts with label Recipes to try. Show all posts

Tuesday, March 8, 2011

Dairy- and Wheat-Free Crispies

When you are trying to avoid dairy and starchy grains, it is very hard to make any sort of granola-style bar. Most recipes require butter to bind all the ingredients together, that could be substituted for margarine but ingesting trans-fats from the margarine would be even worse than the butter. My ingenious 'binding' ingredient is dark chocolate. As dark chocolate has no dairy in it and in small amounts it is actually good for your health due to the anti-oxidants it contains, I would say that these crispies count as a healthy snack - of course limited to 1 or 2 a day and not the entire batch in one go since that would be rather too much sugar!


For my crispies I used organic spelt flakes. Spelt is the original wheat before it was selectively bred and modified into modern day wheat. Spelt has approximately one-third the amount of gluten of regular wheat (according to Judy Coles' The Body Talks) - it is the gluten in bread that makes it so light and fluffy so spelt bread is much denser and heavier. Due to the fact that it contains less gluten, spelt is much easier to digest and according to Coles' research most people who are intolerant to wheat can eat spelt with no problems - a food intolerance is of course not the same as an allergy.

Similar to wheat, oats have also been highly modified over time and for those of us suffering from IBS and trying to follow a low-starch diet they are less easy to digest than spelt or rye. The spelt flakes could be substituted for jumbo oat flakes and in that case I would try to get organic ones. Buckwheat flakes are entirely gluten-free but they are tiny little flakes that I don't imagine would work quite as well as the large spelt or oat flakes - if you can't have gluten then it would be worth giving them a try though.


Putting the crispies together is extremely quick and easy, all you need is:
100g dark chocolate
8 tablespoons spelt flakes
4 tablespoons mixed dried fruit (you can buy packets of ready-mixed raisins, sultanas and cranberries)
11 cupcake holders (you may make a few more or less depending on how chocolate-y you want them)

1. Melt the dark chocolate in a glass bowl over a pan of boiling water, once it's melted then take off the heat.
2. Add the flakes and fruit and mix together.
3. Spoon the mixture into the cupcake holders and put in the fridge to go hard.

Voila! Yummy little treats ready in moments.

Wednesday, February 16, 2011

Delicious Dips

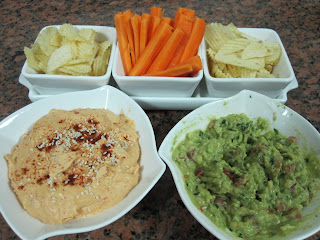
Laying out a tasty dip with vegetable sticks, crisps and pita bread for guests to enjoy before dinner is an easy way to get out of making a starter and a great social way to start the evening. I find that most shop-bought dips have ingredients that I either can't eat (garlic etc) or don't like. Plus, the question is always in my mind whether there is any real nutritional value in something that has so many chemical preservatives in it that it can be kept unopened in the cupboard for up to a year! Here are 2 dips that are extremely easy to make, require minimal ingredients and create that wow factor for your guests with little effort from you.


Avocado Dip
The easiest one of all, all you need is:
1 ripe avocado
3 cherry tomatoes
Juice from half a lemon
Handful of parsley, finely chopped
Pinch of salt and pepper (I don't put pepper!)


1. Mash the avocado in a bowl
2. Dice the tomatoes and stir into the avocado
3. Add salt and pepper
4. Add lemon juice and mix well
5. Stir in finely chopped parsley
6. If you don't eat it immediately, store it in the fridge

You can add cream cheese (Philadelphia) to make the dip go further and you would mix this into the avocado before adding the tomatoes.
To make it more of a Mexican-style Guacamole, you can also add finely chopped chilli peppers to give it a real kick.

It takes minutes to dish out this fabulous-tasting dip. One thing to bear in mind is that this should be made as close to your guests arriving as possible since avocado does go brown quite quickly. If you keep the avocado stone in the dip and keep it covered then this should help stop it browning so quickly.

Hummus


I've seen recipes for hummus that have huge long lists of ingredients and so I always thought this was quite complicated to make. That was until I found a recipe for it in a book called 'Just Four Ingredients' by Joanna Farrow and I realised that actually this is another very simple dip to make. It is a little more effort than avocado dip because you end up with more washing up but the chick peas make this is a nutritious, high protein snack and living in the Middle East it seems wrong not to be able to whip together this quintessential Arabian dish.

400g tin of chick peas - Chick peas don't appeal to me as they are, but in hummus they are fabulous
4 tbsp tahini paste (sesame seed paste)
Juice of 1 lemon
2 garlic cloves (of course I never put these in and it tastes just as good without them)
Half tsp paprika to give it a slight kick - more if you want it spicier
Salt to taste

1. Drain the chick peas thoroughly and blend in a food processor with the garlic
2. Add the tahini paste to the chick peas and blend
3. Add the lemon juice and blend to a smooth paste - if it is still quite solid then add 1 tbsp olive oil or cold water at a time until the consistency is thick but smooth
4. Stir in the paprika and salt
5. Serve at room temperature with some paprika and sesame seeds sprinkled on top for presentation


A fantastic addition to the traditional hummus above is to add roasted bell peppers after you mix in the tahini paste. You can use any colour but red peppers will give a lovely red colour to the dip and they are higher in vitamin C than yellow or orange peppers. The juice from the peppers will also help give you the perfect hummus consistency. Cook them before you start making the hummus so they have time to cool down a bit.

1. Cut the pepper into slices
2. Heat olive oil in a pan over high heat then add the pepper slices
3. Cover the peppers but keep shaking the pan so they don't stick
4. Cook for about 10 minutes until the peppers look a bit char-grilled but are soft
5. Let them cool slightly before adding them to the hummus


Sunday, February 13, 2011

Beef Wellington with Red Wine Jus

The origins of the name Beef Wellington seem to have been lost in time although the various ideas include: it was the Duke of Wellington's favourite dish; it was first made for a dinner reception in Wellington, New Zealand; and a variety of others. I was concerned this could be a bit fiddly to make and that it wouldn't live up to Ainsley Harriott's claims of 'Meals in Minutes' but I was pleased to find that I was wrong. Very easy to make, quick to put together and once you pop it in the oven then you're free to chill out for half an hour...perfect.

The actual recipe contains chicken liver pate but I left this out since pate is not something I would ever choose to eat. Despite this omission, Simon declared Beef Wellington a 10/10 and this is definitely a meal that I will be making for a dinner party at some point - impressive for guests and low-stress for me (plus they can be prepared in advance and popped in the oven once the guests arrive). The only thing I need to work on is my presentation since my parcels didn't turn out looking quite as good as Ainsley's, so it's a scan of his photo below - not mine!


Ingredients
50g unsalted butter
2 tbsps olive oil
1 large onion, finely diced
2 garlic cloves, crushed (I of course left these out!)
225g flat / button mushrooms, finely diced
10g dried porcini mushrooms (I left these out too but if you're using them then soak them in boiling water for 20 mins, then drain and finely dice)
1 tbsp chopped fresh parsley
4 fillet steaks (around 150g each and about 2.5cm thick)
100g smooth chicken liver pate
250g ready-made puff pastry
Plain flour for dusting
1 large egg, beaten
175ml red wine

Method
1. Pre-heat oven to 220 degrees (425 degrees fahrenheit / gas mark 7).
2. Melt half the butter with half the oil and add the onion, garlic and mushrooms. Saute for 10 mins until tender and liquid has all evaporated.
3. Stir parsley into cooked mushrooms, tip everything into a bowl and leave to cool.
4. Season the steaks, wipe out the pan used for the mushrooms and heat it until hot. Once hot, add the remaining oil and sear the steaks on both sides.
5. Leave the steaks to cool. Don't wash the pan because you need it later with the meat juices in it!
6. Cut the pastry into 4 pieces and roll out each piece on a floured surface to about 20cm square. I had ready-rolled pastry and just cut the piece in half for my 2 steaks.
7. Brush the edges of the pastry with the beaten egg.
8. Divide the mushroom mixture between the 4 squares.
9. Spread pate over each steak and place the steak on top of the mushrooms, pate side down.
10. Bring up the 2 opposite corners of pastry to overlap over the steak and seal together. Repeat with the other 2 corners and ensure all edges are sealed. Brush with the beaten egg.
11. Place on a pre-heated non-stick baking sheet and bake in the oven for 25 mins for medium-rare and 5 mins extra depending how well done you want the steak (mine cooked for 40 mins). I was concerned that I hadn't 'pricked' the pastry for steam to escape but this proved not to be an issue and as the oven is so hot, the pastry didn't get soggy on the bottom - which had been my other concern.

What I don't understand when I look at Ainsley's picture, though, is that it shows the mushrooms on top of the steak whereas the recipe has the steak on top of the mushrooms! To get this same presentation, when you put the parcels on the baking tray you would need to put the side with the pastry edges on the bottom - simply turning it over once it's cooked wouldn't work because the bottom won't be crispy like the top. My parcels had the mushrooms under the steak and they tasted delicious in any case.

To make the red wine jus:
1. Place the frying pan used to cook the mushrooms and steaks on the heat.
2. Pour in the wine and simmer to reduce by two-thirds.
3. Stir in the remaining butter (or you could stir in some cream, or do like I did and add nothing else) and season.

Serve it with whatever takes your fancy. Ainsley recommends broccoli, I had broccoli as well as other veg and a small baked potato each. I have a feeling I'll be making this again very soon!

Friday, February 11, 2011

Bang Bang Chicken

Simon came home last night to find no dinner being cooked and no piles of dishes waiting for him to wash...had I decided on a take-away? No, I'd made Bang Bang Chicken which is served cold so that meant I'd been able to get it all finished and dishes done long before he arrived - I'm now worried this may become one of his most-requested dinners!

I have no idea where the name of this dish comes from and it could be made with any meat or tofu, not just chicken. According to the recipe, this is a dish to make when you have leftover cold chicken - since I didn't have any, I marinated very finely sliced chicken strips and cooked them before letting them go cold. The vegetables are really just salad so that's easy enough to prepare in advance and the rice noodles take minutes to cook and then you leave them to go cold too. The recipe offers a choice of 2 dressings (peanut and sesame) but I only made the peanut dressing - which was absolutely delicious. Both sauces are included below although I can't vouch for the sesame one and since it sounds quite peppery, I have no plans to make it.

Easy to prepare, very easy to throw together and the best bit is the total lack of dishes at the end of the meal!


Chicken
If you have cold chicken in the fridge, just finely shred it and leave it in the fridge until it's time to plate it up.
If you don't have any cold meat, very finely slice your chicken breasts (about 150g per person) and marinate for at least 30 minutes in:
2 tbsp soya sauce
1 tbsp rice wine
1 tsp sesame oil
Stir-fry the chicken on high heat until it's coloured on all sides (this will only take a few minutes since it's so thinly sliced) and then leave in a bowl to cool before putting away in the fridge for later.

Noodles
You can use whatever style of noodles you prefer (egg, rice, bean) but I used rice noodles.
Put the rice noodles (however many portions you need) in a pan with a little salt, cover with boiling water and put on the pan lid.
10 minutes later, drain the noodles, cut them into shorter lengths of about 8 cm, toss with a little sesame oil and leave to cool before putting away in the fridge.

Vegetables
Cut cucumber and sweet pepper (capsicum) into 5 cm strips - remove the seeds from the cucumber.
Toss the vegetables in a bowl with a little salt, cover and keep in the fridge.

Peanut Dressing
Combine the following in a food processor:
2 large tbsp smooth peanut butter
1 tsp light soya sauce
1.5 tbsps brown sugar
2 tsps rice vinegar
1 tbsp rice wine
1 dessert spoon sesame oil
3 cm piece of ginger, cut into smaller pieces
1 tsp chilli sauce
2.5 tbsps chicken stock
1 spring onion (optional - I didn't put any in because I forgot to buy them!)
Blend into a smooth paste - add water if it's too thick - and pour into a sauce boat. Keep at room temperature.

Sesame Dressing
3 garlic cloves
2 cm piece of ginger (cut into smaller pieces)
0.5 tsp chilli sauce
3 tbsps toasted sesame paste
2 tbsps sesame oil
2.5 tbsps light soy sauce
1 tbsp rice vinegar
1 tbsp rice wine
1 tbsp brown sugar
3 tbsps chicken stock
0.25 tsp Sichuan peppercorns
Cook the peppercorns over a medium heat for 7-8 minutes then crush them to a powder once they are slightly cooled.
Combine all other ingredients in a food processor and blend to smooth paste, add the peppercorn powder and then transfer to a sauce boat and keep at room temperature.

Plating Up
On each plate, lay a bed of noodles with the vegetables on top and then add the chicken.
Scatter sliced spring onions over the chicken (optional).
Provide the sauces for each person to add as much as they would like.

Sunday, January 30, 2011

Cottage Pie

Cottage Pie is one of Simon's and my favourite meals; when I made it last week I realised that many people may not actually know how to make this fantastic, quintessential British dish...now you'll be able to! This pie can be made with either lamb mince or beef mince but the dish has a different name depending which meat you use. It was many years before I realised that Shepherd's Pie, as the name does actually clearly suggest, contains sheep (lamb) and Cottage Pie therefore contains beef. Not being a big lover of lamb, I always make Cottage Pie but the recipe remains the same if you want to use lamb mince and I suppose it could be made with chicken or pork mince although I've never tried it.

Internationally, British food often has a less than positive reputation but made in the right way, the stews and pies that form the foundation of British cuisine are healthy, satisfying and downright delicious. If you read my article on the food I ate in the UK on holiday last year (English Food - WOW!), you'll see that I was totally blown away by the fabulous fresh food we found there - so the bad reputation could soon be a thing of the past! Cottage pie is not a light meal, it is a hearty one that provides you with your meat, potato and numerous vegetables so it's perfect in cooler weather when you want to eat something substantial. Using lean mince (they call it steak mince here in Dubai) and including lots of vegetables also means that this is a very healthy meal - I've even made it with sweet potato mash on top instead of regular mashed potato which makes it even better for you since sweet potato is full of antioxidants.


Ingredients (for 4 people)
600g lean mince (I reckon on roughly 150g meat per person)
1 x onion (optional)
3 x medium potatoes (you can put more potato but I try to keep our starch levels down)
As much and whatever type of vegetables you like (whatever amount you would usually make for 4 people)
Bisto gravy granuals (this is optional and you could just use flour to thichen the sauce but I find Bisto easy and it adds a nice bit of taste and colour)
Red wine (optional)
Enough water to cover the mince
Salt, pepper and herbs as per your taste
Grated cheese (optional)

Method
1. Preheat oven to 180 degrees.
2. Heat a pan with no oil, tip the mince in and brown it all over - drain off any juices that come out so the meat doesn't boil at this stage but keep the juices to put back in later.
3. Once the meat is all browned, add the chopped onion and some of the meat juices that you drained off.
4. When the onion has softened, add a mug of Bisto (300ml hot water and 2 teaspoons of granuals), any juices that you had drained off and enough red wine to cover the meat (or a mixture of red wine and water or just plain water).
5. Add herbs, salt and pepper, cover with a lid and bring to the boil.
6. Once the liquid is boiling, reduce the heat so it is simmering and leave to cook for 30 minutes (or up to an hour if you have time). Keep the lid on or the liquid will boil off and you won't have any sauce.
7. Chop the potatoes into large chunks, put in a pan of salted water and bring to the boil - lower the heat to a simmer once it's boiling or the potatoes will all break up and become watery.
8. Once the potatoes are cooked through (if you can put a fork through them easily then they are done - usually about 15-20 minutes), drain them, return them to the pan and mash them with some butter, milk (if you want them more creamy) and salt to taste.
9. When the potatoes are almost ready, cook the vegetables in a little oil and some water in a large pan - as they cook they will release liquid so cooking them in with the meat dilutes the gravy which is why I cook them separately.
10. Tip the meat into a casserole dish (check the seasoning and adjust if necessary), drain the vegetables and then mix them into the meat, finally cover everything with the mashed potato and put in the oven for at least 30 minutes.
11. If you like cheese, you can sprinkle some grated cheese on top just before serving and then put it under the grill for a minute.
Don't eat it all at once!

Monday, January 24, 2011

Recipe: Prawn Laksa

It has been a while since I cooked anything that I thought worthy of including on Bon Appetit - not that I've been making disastrous meals, just nothing very 'wow'! That was until I made this fabulous prawn laksa the other day; Simon and I both agreed this was one to write about. Prawn laksa is a complete meal in a bowl but since it's also a sort of soup, it can be a bit messy with noodles and sauce splashing around so I recommend wearing a bib to eat it!

I have to be honest that it did take quite a bit of preparation and from starting to get it ready to sitting down to eat it took a full hour. However, it would work well for a dinner party because it could all be prepared in advance and the putting it together and cooking it part only takes 10 minutes. That is definitely what I'll do next time so I don't feel that I've been stood up chopping and stirring forever when I finally sit down. Also, my blender is one of those very small ones that don't click closed so as I started to blend the ingredients the lid came off and sprayed me, the work top and the floor!! If anyone knows how to get turmeric stains out of my white apron I would love to hear it please!

This is a Thai recipe so it uses fish sauce but I have realised that I really don't like fish sauce since the taste seems to linger in my mouth for ages afterwards. In the Thai cooking class I did last year at the ICCA we were told that fish sauce is the Thai salt - if a dish doesn't have enough salt, fish sauce is added and if it's too salty then coconut milk is added. Since soya sauce does the same thing in Japanese cooking, I will personally use soya sauce instead of fish sauce in the future.


Ingredients - it looks like a lot but it's not that much!
1.5 tablespoons ground coriander
1 tablespoon ground cumin (I used 0.5 teaspoon curry powder instead as I don't like cumin)
1 teaspoon ground turmeric
1 onion, roughly chopped
1 x 3 cm piece fresh ginger, roughly chopped
3 garlic cloves (I left these out since I can't eat garlic)
3 lemongrass stems, bottom part only, sliced
6 macadamia nuts (I couldn't find these so used cashews instead - I put in a liberal handful)
4-6 small red chillies (I always worry about the potential heat of chillies so I used half a teaspoon of chilli sauce from a bottle)
2-3 teaspoons shrimp paste (I couldn't find this either so just left it out)
1 litre chicken or vegetable stock (I only used about 750ml stock because I didn't want a huge amount of sauce)
3 tablespoons oil
4 kaffir lime (makrut) leaves
2.5 tablespoons lime juice
2 tablespoons fish sauce
750ml coconut milk (I actually just put in one 400ml tin of coconut milk, it depends how much soup / sauce you want)
2 tablespoons soft brown sugar
750g raw prawns, peeled and cleaned (you can keep the tails on for presentation but I always find that a pain when I'm trying to eat so I removed the tails before cooking)
250g dried rice vermicelli
90g bean sprouts
4 fried tofu puffs, thinly sliced (Simon doesn't like tofu so I didn't include this)
3 tablespoons mint, roughly chopped
2 large handfuls coriander (cilantro) leaves

Not actually part of the recipe but I thinly sliced mangetout (snow peas), courgette, baby corn and bok choy to give a bit more vegetables to the dish.

Method
1. Place all spices, onion, ginger, garlic, lemongrass, nuts, chillies and shrimp paste in blender. Add 125ml of stock and blend to a paste.
2. Heat the oil over a low heat, add the paste and cook for 3-5 minutes, stirring constantly.
3. Add the remaining stock, bring to the boil and then reduce to a simmer for 15 minutes until slightly reduced.
You could stop here and finish the cooking just before you're ready to eat.
4. Heat a small amount of oil in a pan and add the mangetout, baby corn and other vegetables - they will take about 5 minutes to cook. Add a little water as the steam will help the cooking.
5. Place the vermicelli in a large pan and cover with boiling water, put a lid on the pan and leave for 5-7 minutes then drain. The pan doesn't need to be on the heat, the boiling water from the kettle is enough to cook the noodles.
6. Add the lime leaves, lime juice, fish sauce, coconut milk and sugar to the laksa and simmer (don't boil) for 5 minutes. Do not cover or the coconut milk will curdle.
7. Add the bean sprouts and prawns - cook until they are pink (only takes about 2 minutes). Do not overcook the prawns or they will be chewy.
8. Put the dish together: place noodles in the bottom of a bowl, lay the vegetables on top and then ladle the prawn laksa over everything, top it off with the tofu, mint and coriander leaves.
ENJOY!

Wednesday, January 5, 2011

Galette des Rois - The End of Christmas

The 6th of January is the date of Epiphany and the official end of Christmas; this is reputedly the day the three kings arrived with gifts for the baby Jesus. In France, Epiphany is celebrated with a cake called a Galette des Rois (Kings' Cake) in which a ceramic figurine is hidden - whoever gets the figurine in their slice is crowned King or Queen for the day. I was given a recipe for a Galette des Rois by a teacher of mine in France way back in 1997 and had never made it. Fourteen years later I finally decided to give it a go and incorporate a new tradition into our family!


A galette is a cake made with puff pastry, I bought frozen pastry that I had to roll out but it would have been even easier if I'd bought the ready-rolled variety. Inside the galette is a layer of almond paste, although we all agreed that adding a bit of cinnamon or ginger to the paste would have given the cake that little bit extra flavour. As I didn't have any ceramic figurine - a plastic one wouldn't have been a good idea! - Simon came up with the good idea of placing a whole almond inside instead and that worked perfectly. It was extremely easy to make, took just 30 minutes to cook and it can be eaten either cold or hot straight from the oven. My memories of the galette in France are of a much thinner cake than mine turned out to be, but that was probably just the type of pastry I had bought. Before you think I've lost track of my days...I was having dinner with my parents and extended family yesterday and not tomorrow so I just tied it in with that!

Ingredients
2 pre-rolled sheets of puff pastry (approx. 250g each)
100g almond meal (if you can't buy it then just grind up almonds in your food processor)
100g butter (make sure it's soft before you start)
80g caster sugar
2 whole eggs (plus 1 yolk for glazing)
50 ml rum (I just realised I forgot to put the rum in my cake yesterday - that would have added that little bit of kick to the flavour!!)
1 whole almond

Method
1. Preheat the oven to 210 degrees (less for fan-assisted ovens).
2. Beat the butter until it is soft and mousse-like.
3. Add the sugar and beat together until it forms a paste.
4. Beat in the almond powder.
5. Mix in one egg, then add the second egg.
6. Add the rum.
7. Lay one layer of pastry on a baking tray and spoon the almond paste on top - leave a border of about 3cm the whole way round.


8. Lay the whole almond somewhere in the paste.
9. Cover the paste with the second layer of pastry and press the two pastries together around the edges with your fingers so they are totally sealed.
10. With a fork, prick all over the top of the pastry (this lets the steam escape).
11. Glaze the pastry with the egg yolk mixed with a teaspoon of water.


12. Place the galette in the fridge for 15 minutes.
13. Move the galette into the oven and cook for approximately 30 minutes in the centre of the oven.
14. Keep your fingers crossed that you get the almond and become the Queen or King!

NOTE: In France, the galette is round but I decided it would be easier to leave the pastry square, although as I write this I realise that I could have used a round tin as a template to cut the pastry so both sheets would have been the same size. Next time...


Thursday, December 9, 2010

Baking Scones: A Comedy of Errors

When I was last back in the UK, my Granny made the most delicious wholemeal scones. Having a hunkering for them, I asked her to send me the recipe so I could make them myself. A straightforward recipe, I thought they would be a breeze to make...then Fate stepped in to make my attempt so much more 'interesting' than it should have been!

Firstly the wholemeal flour. I presumed I could buy it anywhere...wrong. I'd been to the Organic Cafe & Food Shop in the morning but didn't bother looking at their flours since I planned to buy it at the normal supermarket. The only wholemeal flour Choithram's had was made by a local company (Jenan) and I didn't get the feeling that it would be the highest quality flour in the world so off I drove to Spinneys (just 5 minutes away) to find that they didn't have any wholemeal at all. After an emergency call to Simon to go to the Organic Shop and buy me my flour on his way home, he arrived home with self-raising wholemeal flour and assured me that was all they had had. Last time I was shopping in LuLu I had seen they stocked a huge range of flours so yesterday I made the 30 minute journey in the hope they would have normal wholemeal flour. All they had was strong wholemeal bread flour. After verifying with my Mum I learned the self-raising would be better than the strong bread flour...30 minutes back home again to use the flour that I already had. A great start! One bright thing was that LuLu had the black treacle I needed whereas neither of the other 2 supermarkets had it.

I carefully measured out all the dry ingredients and followed the instructions to "rub the butter into the flour until it forms fine crumbs". Sounded so easy, but with butter straight out of the fridge it was anything but. Once that was finally done, I added the other dry ingredients and then the milk. I think that after all my driving around and then faffing around rubbing the butter and flour together I must have been a bit tired because where it was written '1/2 pint of milk' I read '1 pint of milk'. It's not hard to imagine what adding twice the amount of liquid did to my dough - it was more like a pancake batter but it was only when the recipe said to roll the dough into a ball that I cottoned on to the fact that I had made a rather large mistake! What to do? Double all the dry ingredients and make twice as many scones or throw the first batch in the bin and start again? With the air turning blue, I poured the whole lot in the bin and set off to the supermarket to buy more milk.


Second time around, I'd left the butter out of the fridge so the 'rubbing' was much easier and quicker and this time I added the correct amount of liquid. After trying to stir it with a wooden spoon I realised that only using my hands would do the job properly. Now, I am not very tall and my kitchen units are a standard height which are fine for chopping veg but when it comes to getting your hands in a big glass bowl and mixing a dough...I had to stand on my tip-toes to reach in, was covered in flour and all I could think was, "I am never making b****y scones ever again". With the dough finally kneaded together, rolled out and scones cut out, I put them in the oven and waited for them to cook.


Fifteen minutes later with the smell of freshly baked scones in my nose, I cut one open, lathered on my jam and took a bite...of heaven. Yes, absolutely delicious!! All the effort to get to that point undoubtedly added to the flavour and I decided that it had been worth it and I will most certainly make them again. Next time I'll be sure to have the butter at room temperature, will never again mistake 1/2 and 1 pint and I realised that once the ingredients were roughly mixed I could have tipped them out of the bowl onto the worktop and kneaded it on there...so it will be a breeze when I come to make them again (hopefully not tempting Fate!)


Ingredients
I was given the ingredients in imperial so I've put the metric equivalents in brackets
1 lb (450g) wholemeal flour
2 oz (50g) butter
1/2 tsp salt
2 oz (50g) caster sugar
1 tsp bicarbonate of soda
2 tsp cream of tartar
1 tbsp black treacle
Half pint (275ml) milk - approximate, add slowly and check consistency (as I typed this I realised that I actually didn't use enough milk since I misread - again! - my equivalent chart and I put 225ml of milk instead of 275ml, but they still turned out perfectly fine)

If you get self-raising wholemeal flour then add an additional 1/4 tsp baking powder

Method
1. Preheat oven to 190 degrees (fan assisted oven)
2. Rub butter into flour until it forms fine crumbs
3. Add other dry ingredients
4. Mix milk and treacle (it may help to warm them both slightly, especially the treacle)
5. Make a well in the flour and slowly pour in the liquid, mixing as you go until you can form it into a ball
6. Flour your worktop and lay the ball of dough down to roll out to about 1cm thick (or a bit thicker if you prefer)
7. Cut out your scones (I used a 4.5cm cutter and got about 36 scones but if you use a bigger cutter then there will of course be less scones)
8. Put scones on lightly greased baking tray and cook for about 15-20 minutes

Try to resist eating them all at once!!

Wednesday, December 1, 2010

Blackberry Crisp

Desserts are a bit tricky for me since I'm not supposed to eat eggs, dairy or wheat and it seems that almost all desserts include those. With my family coming for dinner, and not wanting to give them fruit salad for the hundredth time, I decided to make an effort to find a dessert I could actually eat. Finally I resolved that a little bit of butter wouldn't kill me and selected this Blackberry Crisp recipe from Nigella Lawson's book, Nigella Express. I suppose the butter could have been substituted with margarine but with everything I've read about the transfats in margarine causing heart disease and clogging your arteries, I thought butter was the lesser of the two evils!

This blackberry crisp is so easy to make and tasted gorgeous. I used frozen fruit since the fresh variety were so expensive - of course I defrosted the berries before preparing the dish since I knew there would be a lot of liquid released as they defrosted and I didn't want the topping flooded with juice. Although the name is blackberry crisp, I mixed blackberries and raspberries to add a bit more variety. As I don't have any normal flour in my house, I used spelt flour instead and again it didn't seem to make any difference to the taste. The one thing I did forget to do was take a photo of my finished dish...so this is Nigella's photo, although mine really did look very similar.


Try it, I guarantee you will not be disappointed.

Ingredients
125g butter
60g jumbo oats
40g flaked almonds
30g sunflower seeds
70g flour
1 teaspoon ground cinnamon (or ginger if you prefer)
75g soft light brown sugar
500g blackberries
50g caster sugar

Method
1. Preheat the oven to 200 degrees / gas mark 6.
2. Melt the butter in a pan and put aside.
3. Combine the oats, almonds, sunflower seeds, flour, cinnamon and brown sugar in a bowl.
4. Tip the berries into a wide, shallow baking dish (about 750ml capacity), sprinkle the caster sugar over them and tumble them about to mix.
5. Stir the melted butter into the dry oat mixture and spoon it on top of the berries - you don't need to fully cover them.
6. Bake in the oven for 25 minutes and serve with ice-cream.
Enjoy!

Tuesday, October 26, 2010

Fantastic Baby Corn & Chicken Soup

I've been trying a swathe of new recipes from a book a friend gave me a while ago, Homestyle Asian (Murdoch Books). Everything I've made has been nice but the one dish so far that has stood out as fantastic is the baby corn & chicken soup. It is kind of like a Thai-style sweetcorn & chicken chowder so it is full of flavour and has a great bite to it. The photo is scanned from the book since the photo of my soup didn't look half as good! However, the taste is absolutely delicious and I highly recommend you try it - don't worry, it's very easy to make.


Ingredients
150g whole baby corn (or a tin of baby corn) - cut lengthways in half or quarters depending on size
1 tablespoon oil
2 lemongrass stems - white part only, very thinly sliced
2 tablespoons grated fresh ginger
6 spring onions - chopped
1 red chilli - finely chopped (I didn't put this in and just put a half teaspoon of chilli sauce)
1 litre chicken stock (I used vegetable stock and put a bit more than 1 litre since the soup seemed a bit too thick - see how you feel and add more if necessary)
375ml (1 can) of coconut milk
250g boneless, skinless chicken breast - cut into small dice
135g (1 can) creamed corn
1 tablespoon soy sauce
2 tablespoons finely snipped chives to garnish
1 red chilli to garnish - thinly sliced


This makes enough for 6 people at least.


Method
1. Prepare all the ingredients before you start cooking.
2. Heat the oil and cook the lemongrass, ginger, spring onion and chilli for 1 minute - stir continuously.
3. Add the stock and coconut milk and bring to the boil - do not cover or the coconut milk will curdle.
4. Add the chicken, creamed corn and baby corn and simmer for 8 minutes. NOTE: if you're using tinned baby corn then add it for the last 2 mintues only.
5. Add the soy sauce, season well and serve garnished with the chilli and chives.
6. Enjoy!

Monday, October 18, 2010

Dairy-free Chocolate Dates

Chocolate dates have got to be one of the most delicious treats there is (I don't like plain dates, only when they're covered in chocolate). Sadly most of the commercially produced chocolate dates have powdered milk or butterfat added to the chocolate - even the dark chocolate ones. As I was pondering the problem at the supermarket the other day, my husband nonchalantly asked why I didn't just make my own. Why hadn't I thought of that? The perfect solution...and so easy.

The dates I bought still had their stones in so I had to cut them open to remove them - breaking a tooth on a stone wasn't the unforgettable experience I was aiming for! It was easy to do, but buying ready-stoned dates would make an easy process even easier. I then placed an unsalted cashew nut in each date - any nuts can be used but putting a different nut in each date would actually make it more interesting come the devouring time so I'll get a variety of my favourite nuts in for the next time. 70% dark Lindt chocolate has no butterfat in it and isn't too dark to be bitter, I melted a row of chocolate squares in a glass bowl over boiling water and once it was fully melted I rolled the dates (just 5 of them in case the results weren't very good) in the chocolate and put on some greaseproof paper to set in the fridge. Ten minutes and they were done!


The important taste test came later when my family came for dinner. "Hmmm, almost Bateel," my brother announced as he munched away. Success! [For non-Dubai residents, Bateel produces very expensive luxury chocolate dates]. Not only does this mean I can eat my favourite sweet indulgence, but I'll save a fortune since even a box of non-Bateel chocolate dates are around Dhs 50 ($14) and they are an extremely health snack.

Benefits of dates:
They contain magnesium (needed for bone development and energy metabolism), iron (needed to produce red blood cells), potassium (needed to maintain muscle contractions - including the heart) as well as multiple other vitamins and minerals.

Benefits of nuts:
They are a great protein source and contain healthy fat (see my article on Fats to understand why it is essential to include healthy fat in your diet), vitamins and minerals. Every nut has its own individual health benefits - another reason to use a variety of nuts to stuff the dates with.

Benefits of dark chocolate:
Yes, dark chocolate (65% cocoa content or higher) is good for you! It can help to lower blood pressure and lower cholesterol because it contains high levels of flavonoids which act as antioxidants to protect the body from free radicals (dangerous molecules produced as part of the digestive process which have been shown to cause aging and contribute to chronic illnesses). White and milk chocolate do not have these benefits as the cocoa content is too low.

Dates, nuts and dark chocolate are of course high in sugar and/or fat so it's not a good idea to eat too many, but 1 or 2 a day as part of a balanced diet will give you all the benefits you need. Plus it's a healthy way to satisfy any sugar craving. What more could you ask for?

Friday, July 23, 2010

Fabulous Stuffed Vegetables

I am not the least bit inventive in the kitchen - I need a recipe to follow, which explains why I have so many recipe books. Most of the time what I cook wouldn't win any prizes but is very nice, however, occasionally I cook a recipe (such as the Flourless Chocolate Cake) that really knocks Simon and I out. These Stuffed Vegetables are one of those items. A few months ago I bought a cheap recipe book called 500 Main Courses, edited by Jenni Fleetwood. Wow! I usually struggle for inspiration with vegetables and end up just stir-frying them but this book has tons of vegetable dishes that could work as vegetarian main courses but that I use as accompaniments for our meat / fish. I defy anyone to make these peppers and not love them since they retain their moisture (Simon can't stand dry food), are full of colour and full of flavour. Plus they're very easy to make and I am sure will be weight watcher's friendly!


Ingredients:
2 large ripe tomatoes
2 large bell peppers (yellow / orange - more vitamins and more anti-inflammatory than green and red ones)
60ml (4 tbsp) olive oil
2 onions, chopped
2 garlic cloves, crushed (obviously I miss this out since I can't eat garlic)
50g (1/2 cup) blanced almonds, chopped (I used cashews since I found I have an intolerance to almonds)
75g (just under 1/2 cup) cooked long grain rice (I actually use brown rice)
15g mint and 15g parsley, roughly chopped (you'll be surprised how much mint this actually is, but once it's chopped then it suddenly looks like a very small amount)
2 tbsp sultanas (or raisins)
25g (2 tbsp)
Salt and pepper
2/3 cup boiling water
Chopped parsley to garnish


1. Preheat oven to 190 degrees centigrade (375 fahrenheit, gas mark 5).
2. Cook the rice ready to use later.
3. Cut tomatoes in half, scoop out pulp and seeds with a teaspoon (keep them!) and leave tomatoes to drain on kitchen paper with cut sides down.
4. Roughly chop the tomato seeds and pulp.
5. Half the peppers through the stalk (keep the stalk attached for presentation) and scoop out the seeds to hollow them out completely.
6. Brush the peppers with 1 tbsp of the oil and bake (cut side up) in an ovenproof dish for 15 minutes.
7. While the peppers are chargrilling, fry the onions in the remaining oil for 5 minutes then add the garlic and nuts and fry for another minute.
8. Remove the pan from the heat and stir in the rice, chopped tomatoes, mint, parsley and sultanas - season well.
9. Take the peppers out of the oven and add the tomatoes (cut side up) in the dish.
10. Season the peppers and tomatoes with salt and pepper.
11. Spoon the rice mixture into the peppers.
12. Pour 2/3 cup of boiling water around the tomatoes and peppers and bake, uncovered, for 20 minutes.
13. Serve garnished with fresh herbs.

Friday, July 16, 2010

Melanie's Flourless Chocolate Cake

Simon's cousin Melanie asked me to give her a recipe she can make and I thought a chocolate cake would be just the thing. The beauty of this one is that it doesn't use any flour - it has hazelnut meal instead. I have made this many times but this time I took it out of the oven a little too early so the lovely high cake that came out of the oven collapsed a bit and became what you see below. Still, I covered it with icing to hide the imperfect look and it tasted just as good. Warning: this cake is very rich and won't do your waistline any good but it is AMAZING.


Ingredients:
35g cocoa powder
80ml hot water
150g dark eating chocolate
150g butter
295g brown sugar
100g hazelnut meal
4 eggs - separated


You don't need to buy hazelnut meal, just simply put 100g of whole hazelnuts in the food processor and whizz them up to make the meal (flour). Easy.


1. Preheat the oven to 180 degrees centigrade
2. Grease a deep 20 cm cake pan and line it with baking paper
3. Blend cocoa and hot water in a large bowl until smooth
4. Melt the chocolate and butter together in a pan (no need to do it in a bowl over water, the butter will enable the chocolate to melt without any problem)
5. Add the melted chocolate and butter to the cocoa and mix together
6. Stir in the hazelnut meal and egg yolks
7. Beat the egg whites in a bowl until soft peaks form
8. Fold the egg whites into the chocolate mixture in two batches - this will help the cake to rise so it's important to keep the air in the egg whites, if you stir them in then the air will disappear
9.Pour the mixture into the pan and cook uncovered for 1 hour
10. Stand the cake in the pan for 15 mins after you take it out of the oven and then turn it onto a wire rack


I always serve this cake with ice-cream to reduce the richness of it. Here's what the cake should look like so try it out and let me know if you succeed better than me! For more great chocolate recipes, look for The Australian Women's Weekly book simply called 'Chocolate'.